How to make a paper dragon to celebrate Chinese New Year!
A brightly coloured dragon head made with paper as part of a paper Chinese New Year dragon design.
Why not make this amazing paper celebration dragon to celebrate Chinese New Year? The easiest way to do this is to follow the instructions in the video below. You can pause the video at each section so you can work on your dragon.
Just in case, we have also written out the instructions for you here:
You will need:
A4 paper
coloured pens or pencils (or even paint will do)
black felt tip or marker pen
2 straws
glue
tape
a ruler
Make your dragon head
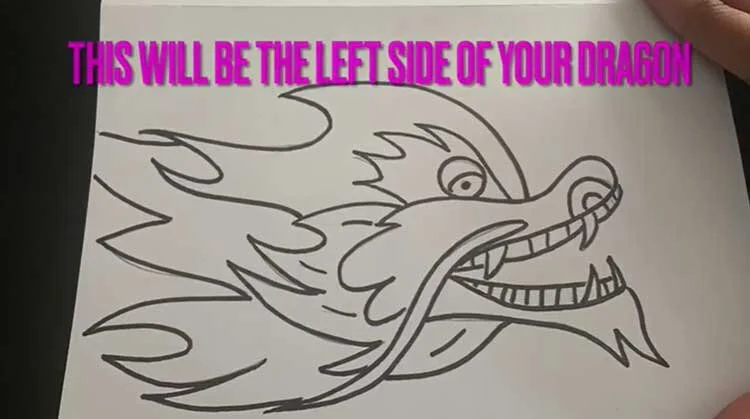
Start by designing your own dragon head. Here is where you can get creative! Draw your dragon on a piece of paper in side profile. Chinese dragons often have a moustache and beard shape, and lots of flowing hair like in the picture below! Don't forget the sharp teeth! If you want, you can use our template - click this link to download and print out.
Once you have drawn your dragon in profile, go over the lines with a black marker pen or felt tip. Then, you can turn it over and see the dragon shape on the other side. This will allow you to then trace the dragon facing the other way on another piece of paper (and repeat going over the lines in black marker pen).
When you have both your dragon heads, add some colour to them and cut them out.
You can then glue the noses together on the inside until you have a two sided dragon head. Remember, only glue the nose together - you will need access at the back of the dragon head to attach the body later!
Make your tail pieces
To make tail pieces, take two A4 pieces of paper and fold them in half, lengthways. Draw flame shapes on the folded piece of paper, and cut them out. If you have drawn two flame shapes, you will end up with four flame shapes! Then add some colour to make them really stand out.
Make the body shape
To create the body you will need to glue two bits of A4 paper together (landscape, not portrait). This should provide you with one really long piece of paper. Create a design on the paper - scales are typical for dragons but you can get as creative as you like! Outline your design in black pen, and add some colour to your patterns.
Add cuts to make it move
Grab your ruler and on the shorter end of your long bit of paper make a mark in the middle (around 10.5cm in from the edge). Next make a mark 2cm away from this centre point on each side. Use your ruler to make two lines all the way down the centre of the long bit of paper along the 2cm points, so that you have a central channel running through the paper like in the picture below.
Next, mark along the top long side of your paper at 2cm intervals and draw lines down to the central point. Do this on both sides of your central section like in the picture below.
Then, using your scissors, cut down each of the smaller lines without cutting through the central space. Next turn your paper over, and glue each loose strip of paper to each corresponding loose strip of paper on the other side, so you form a hoop. This gives your dragon the ability to move in a fluid motion!
Attach the head and tail
When you have made all the hoops which create the body, it is time to attach the head and tail. Attach the head by placing one end of your body structure in between the two head pieces. Glue it in on both sides. Next, glue your tail-flames to the last hoop at the other end so they are poking out.
Add your straws
Finally, get your two straws and make 3 small 2cm long snips in them down one end. Fold these straw strips down to make a kind of helicopter blade shape, and attach tape to them, so that the the sticky part of the tape is facing upwards. This is what you will use to attach it to your dragon. To attach the straw you can poke it through one of the hoops and attach to the top of the body tube. Make sure you add one straw near the head at the front, and one straw to the other end near the tail so you can move your dragon effectively.
That's it! Please share your creations with us!


